Automate Kajabi Digital Tax VAT Handling
In only 3 steps, you can be compliant with VAT rules by automating digital tax handling on Kajabi. Vatstack makes quarterly reporting fast, easy and, most importantly, accurate.
Grace TeoPublished August 17, 2020
Selling online courses comes with a great deal of workload. Using the all-in-one platform, Kajabi helps in building a site to sell courses to your community.
There is only one problem. Kajabi doesn’t add sales tax natively into your pricing. The sales tax referred to here is what the European Union or United Kingdom call value added tax (VAT). Your offer has to consider a percentage of tax at the point of sale.
Since the average VAT rate in the EU is around 21%, you may want to add an additional 20% to your price to account for VAT. If your digital course sells for $100, the final price would be a suggested $120. You would then forward the collected VAT amount to your tax office (a One-Stop Shop, or OSS in the EU) when tax filing is due.
Where Are Your Customers Located?
This is where it gets complicated. The EU requires you to report the collected VAT according to the location of your customer (not the location of your business operations). VAT is a consumption tax, after all.
While you could add a flat-rate of 20%, you cannot simply report and forward that amount.
Each EU member state has its own VAT rate. Hopefully, your business is doing great and you have customers from each of the 27 EU countries. You must account for each sale individually, verify your customer’s location, keep a record of a location evidence, and report the applicable VAT rate accordingly.
Reverse Charge VAT Business Customers
Since VAT is a consumption tax, businesses normally do not pay a VAT (or can get it refunded if they do). You remove the VAT amount in invoices if you sell telecommunication, broadcasting, and electronically supplied services (TBE) to a business customer.
To prove that you are indeed transacting B2B, you have to request and include your customer’s VAT identification number in an invoice.
While our core business is to validate VAT numbers, Kajabi unfortunately does not offer a field to input a VAT ID on checkout pages. We have no control over that page and recommend that you reach out to Kajabi’s customer support and request to have this field implemented.
Automated VAT Reports
We know that you would rather be taking care of your business and servicing your customers. Don’t bother going through the different rates from each EU country and worry if the rates are accurate or not. Vatstack produces an automated report at the end of every quarter. Be assured that the rates applied to your transactions are always accurate and compliant.
You just forward it to your tax consultant, accountant or file it with your OSS if you are doing this yourself.
The report can be downloaded as a CSV file and every figure in it can be copy-and-pasted directly to the respective fields in your filing.
Easy Integration With Vatstack
No coding required for integration. Yes, you read it right. It only takes 3 steps to get started. These instructions assume that you have configured Kajabi to pay you through Stripe.
1. Collect Billing Address
Set Kajabi to collect the billing address with each sale to establish which VAT rate is applicable based on the location of your customer.
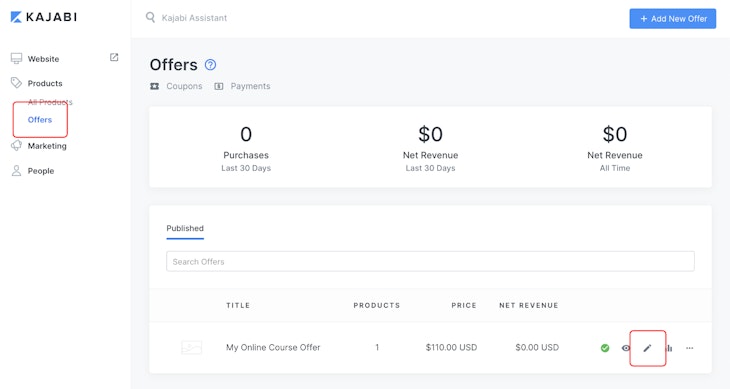
In your Kajabi dashboard, navigate to Products > Offers and click on the pencil icon of your offer to edit it.
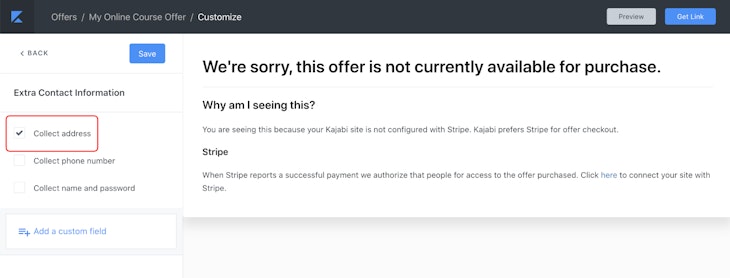
Then go to Edit Checkout. In the settings window, click Extra Contact Info and activate Collect Address. Click Save before exiting the window. We need to collect your customer’s address to determine the correct VAT rate.
2. Create an Account With Vatstack
Once you have verified your email address, add a payment method and subscribe to a plan. Every subscription starts with a 14 day free trial before you get billed for the first time.
3. Connect Vatstack to Stripe
In Vatstack’s dashboard, go to Integrations and click the button to Connect with Stripe. You will be prompted to authorize Vatstack to receive important events occurring in your Stripe account.
Since you’re interested in compliant invoicing, you should enable read and write access. This keeps tax rates synchronized on Stripe. Please note that Kajabi only creates invoices for a subscription. If you sell one-off products only, giving read-only access is perfectly sufficient.

Once connected, you will find a few settings as shown below:
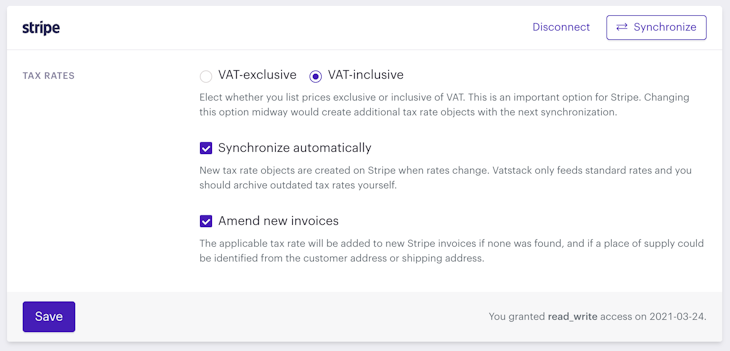
- VAT-exclusive or VAT-inclusive: This is normally a one-time setting and you should choose VAT-inclusive here because Kajabi won’t show a VAT separately during checkout. Try to mention that all prices are VAT-inclusive on your product page.
- Synchronize automatically: New tax rates are created on Stripe as soon as VAT rates change in our database. You eliminate manual maintenance of your tax rates. Note that this only works for standard rates.
- Amend new invoices: New Stripe invoices are generated by Kajabi each time your customer makes a purchase. This option is particularly relevant if you send Stripe invoices to customers and want to ensure VAT is correctly stated. Vatstack will try to determine the place of supply based on the billing address that Kajabi asks during checkout.
That’s it. Click the Synchronize button for a manual synchronization and you can watch the magic happen. New payments that Kajabi initiates on Stripe will be read and handled by Vatstack, and are included in VAT reports for your tax office.
You will be reminded whenever quarterly reporting is due by email.
